Brinno Time Lapse Tip - Checking the Camera Status

2019 UPDATE: If you want an amazing new long term time lapse camera, please check out the Afidus ATL-200 at www.AfidusCam.com. We also have a web site dedicated to sales and support of time lapse cameras at www.TimeLapseCameras.com. Customer care is very important to us and we are here to ensure your time lapse project is a success.


Brinno-Pro-Record-Indicator.jpg

One of the Brinno questions I hear often is, "how do I know the camera is recording?" Quite simply if you press and hold the OK button on the camera you will see, REC. This means you are recording. This confirmation will generally suffice for long term projects. Typically, I rely on the very conservative battery life charts under the camera specifications on Brinno.com. The recommend times can be doubled when using the Timer function. If the site suggests the camera will last 156 days I know I don't need to check the camera until four months have past. The key is, having fresh batteries and seeing REC in the display.

Brinno-BCC100-Recording-Indicator

There are many times I walk away from the camera, second guessing whether I saw REC. A little known tip is you can press the OK button for a second, if the camera is recording the green LED at the top will illuminate. If the camera is not recording the display will show.

The LED status indicator works for both the TLC 200 Pro and the TLC 200 f/1.2 (BCC 100) whether or not the LED indicator is turned off within the settings.

The indicator is a great feature for short duration time lapse creation. Projects from a few minutes to a few days, especially if you are starting and stopping the recording to change the camera position or to avoid unwanted segments. Just a quick tap and you can be assured your camera is recording.

Brinno-TLC200-Pro-Recording-Indicator.jpg

In summary, press and hold OK to start recording (REC) once the screen sleeps, you can tap OK to see the green status LED to confirm a recording is in progress. To stop the recording press and hold OK for a few seconds until you see Processing.

We have discussed expanding this feature in the future, possibly adding a warning indication for low battery and card capacity. For now, you still need to process your video to check the battery and card status. With the excellent battery life and the confirmation indicator you will not need to end the recording often and the little green light will give you the piece of mind your recording is still going.


In Tags ,

Brinno Focusing and Must Have Accessory, ABR100 Card Reader

2019 UPDATE: If you want an amazing new long term time lapse camera with wi-fi app preview, please check out the Afidus ATL-200 at www.AfidusCam.com. We also have a web site dedicated to sales and support of time lapse cameras at www.TimeLapseCameras.com. Customer care is very important to us and we are here to ensure your time lapse project is a success.


Update 8/20/2016: The Brinno ABR100 is no longer available. I have sourced a similar product which works equally well. Micro USB OTG Card Reader for Android Phones

Every now and then I run across a great product which simplifies and improves my video work. The Brinno ABR100 Card Reader allows you to frame and focus your Brinno camera, with live view, using an Android phone screen. For Brinno TLC 200 Pro time lapse shooters the ABR100 Card Reader is a brilliant piece of must have simplicity.

Brinno-ABR100-Card-Reader-Phone-Preview
Brinno-ABR100-Card-Reader-3D-Printing

Ever since I started shooting with the Brinno TLC200 Pro I have longed for a good way to accurately frame and focus the camera. The camera screen is adequate under most circumstances with the included lens, footnote below. However, often I place the camera in a corner, suction cup it to a window, use optional lenses or want a specific point in focus. I needed a solution for framing and focusing without being dependent on the camera's screen.

Binno-ABR100-OTG-Card-Reader

Until the ABR100 came along I would use a laptop and web cam software. This solution works very well but with the camera in a hard to reach location, a 3' USB cable with a laptop on a 10' ladder is not an ideal solution. However, a computer is great for studio or desktop type work and for those who want to try this route, see the second footnote below.

Brinno-ABR100-Card-Reader

What makes the Brinno ABR100 reader special is the USB On-The-Go (OTG) specification which allows an Android phone or tablet to host a USB device, in this case the Brinno camera. Added benefits are the SD and Micro SD ports which allow you to read any SD card including all Brinno's on your Android phone or device.

How to use the ABR100

1) The ABR100 is no longer available from Brinno. I have sourced a similar product which is available on eBay

2) Using your Android phone, visit the Google Play store and download the CameraFi app by Vault Micro.

3) Plug the reader into your phone and using an Micro USB to USB cable (many Android phone charging cables), plug the camera into the reader.

4) Turn the camera on and launch the CameraFi app. The camera's view should display on your phone and a large USB icon will show on the camera display.

This set-up works very well for accurate framing and focusing. Typically I adjust the camera settings before using the ABR100.

Footnote - previewing on a computer: I recommend using a standard Micro USB to USB cable (many Android phone charging cables will work well).  My software of choice is Debut (PC/Mac). Connect the camera to your laptop, turn the camera on and launch Debut. Your camera should be recognized, if all you see is your face, your built in web cam is active. Within Debut go to Network and select the TLC 200 Pro. This will provide you with a full screen preview, frame and focus, unplug the camera and start recording.

How-to-Focus-Brinno-TLC200-Pro-Time-Lapse-Camera

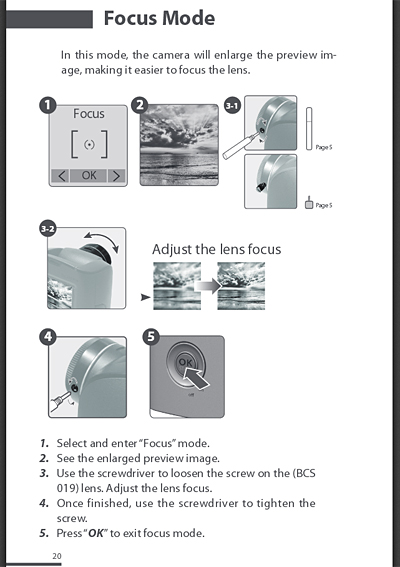
Footnote - focusing using the camera screen: Using the Brinno Pro's focusing screen works very well if you have room to position yourself behind the camera. Detailed on page 20 of the manual, focusing becomes quite easy once you understand how it works.

Typically I frame the capture then select the focus screen window. By pressing "OK" what you see is a zoomed in center portion of your scene. By moving the lens focusing ring and possibly the camera slightly I look for a defined edge (building corner, window, roofline, etc.) once the edge looks sharp, focus has been accomplished. For distant captures you should not need to adjust the focus for every new shoot, however, it's a good idea to double check. Going from distant to close subjects will you need to consider focusing.

To be certain perfect focus is achieved  I will sometimes make a short test movie and play it on a computer.

The screw which locks the focusing ring is very small. I move my cameras around and use them for everything from 3D printing to fire department training. On a few occasions I have wanted to change the focus but did not have a screwdriver. Now, I leave the screw snug, but not tight allowing me to make a change without locating a tiny screwdriver.

Feel free to contact me if you find something which needs clarification or if you have a specific Brinno situation you would like to discuss.

In Tags

Brinno at the International Security Show (ISCWest)

2019 UPDATE: If you want an amazing new long term time lapse camera, please check out the Afidus ATL-200 at www.AfidusCam.com. We also have a web site dedicated to sales and support of time lapse cameras at www.TimeLapseCameras.com. Customer care is very important to us and we are here to ensure your time lapse project is a success.


Brinno-ISC-Tradeshow-Booth

A week ago I was in Las Vegas at ISCWest with the Brinno team. It was a busy three day show with a nonstop crowd of eager people wanting to take in what the Brinno brand had to offer.

There are some exciting things happening with the full product line. The major show announcement was the Brinno Peephole Viewer with Wi-Fi (PHV Wi-Fi).

Brinno-Wi-Fi-Peephole-Viewer
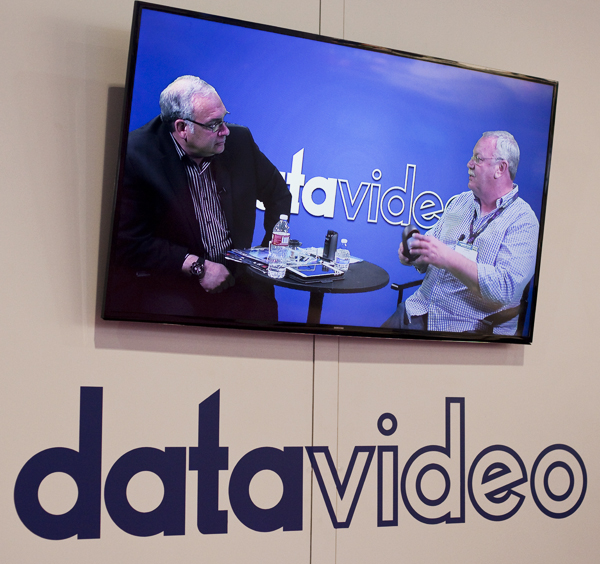
Brinno-ISC-Podcast-Datavideo


A prototype was on-site for a fully functional demo. The PHV Wi-Fi allows users to see who is at the door on their phone or mobile device via an app. Someone comes to the door and a push notification with the visitor's image appears in the app whether the user is at home, the store or on vacation. Images are also stored within the viewer and a live picture is displayed for close proximity viewing.

The PHV Wi-Fi is revolutionary within the security industry as it uses the existing peephole with no external sensors.

Chris Adams, the President of Phase 3 Systems (Brinno's North America distributor) was interviewed on multiple podcasts and his team hosted a VIP breakfast.

Brinno-Pannin-Base-TLC-120

In other product news, wi-fi is making its way into the Brinno cameras starting with the new TLC 120. This is a small version of the Brinno Pro with built-in wi-fi, Bluetooth control, weatherproof and rechargeable.


Brinno's new panning timelapse base was on display. This is an ingenious Bluetooth app controlled device which works with the full Brinno line, other cameras and even offers an adjustable phone slot.

The Solar Joos Orange solar panel was featured as a solution for long term power needs. The Brinno cameras have unprecedented battery life. Adding a Solar Joos panel will power the camera for a very long time.


Brinno-Timelapse-Camera-Line

The Brinno Construction Camera (BCC100) is now shipping to retailers bundled as a package with the Solar Joos. Available very soon this package will be a great option for users looking for uninterrupted power or installation in remote locations.

Wi-fi was the biggest Brinno buzz at ISC but there are many other exciting things coming in the future.

As a photographer and video creator the Brinno line of cameras has allowed me to capture footage which would have been impossible or cost prohibitive. The low cost, easy to set-up and use Brinno solutions are perfect for hassle free time lapse video production.

ISC was my introduction to the security specific side of Brinno and from the Wi-Fi Peephole Viewer to a standalone camera with 14 months of battery life the Brinno brand holds true, Brilliant Innovation.

In Tags

Brinno Time Lapse for 3D Printing Projects

2019 UPDATE: If you want an amazing new long term time lapse camera perfect for 3D printing projects, please check out the Afidus ATL-200 at www.AfidusCam.com. We also have a web site dedicated to sales and support of time lapse cameras at www.TimeLapseCameras.com. Customer care is very important to us and we are here to ensure your time lapse project is a success.


Reposted from the Brinno USA Blog

We made an exiting discovery at the 2015 Consumer Electronics Show (CES) in Las Vegas. Time lapse videos of 3D printing projects are very popular, turning projects which take hours or days to print into interesting and compelling short movies. We at BrinnoUSA are here to support the 3D printing industry.

Josh Banks, our Authorized Solutions Provider, spent a good portion of his time in the Sands Expo Center discussing the Brinno time lapse solution with people in the 3D Printing Industry. One of the biggest discoveries was 3DP Unlimited's amazing use of our cameras to create, their show video.

3DP Unlimited used the Brinno TLC 200 Pro camera which worked perfectly for their needs. Recording a 400 hour print, nonstop, unattended with simplicity not found in other solutions. 3DP wants to experiment more with the Brinno cameras which resulted in Josh presenting 3DP Vice President of Sales & Marketing, John Good, with a Brinno 18-55mm lens which will be great for undistorted close-up work.

In a conversation with Kyla from Solidoodle, Josh showed her the camera and explained the capabilities. Josh asked, if she was interested in the camera, her reply, "everyone in here would be interested in this camera."

IMG_0312_Web.jpg

All of this came about, when Josh had a flight to Vegas with the Spectrom team. What started off as casual CES conversation brought the two technologies together. Josh spent some time with Spectrom at CES and even continued the discussions when they shared the same flight home. For all of the information and future potential, Josh presented Chase Haider, Co-founder of Spectrom, with a Brinno TLC 200 Pro of their own.

The Brinno TLC 200 Pro is our camera recommendation for 3D printing and is available from Amazon, B&H and others listed in the Retailers section.

With all we have learned at CES, we are excited to provide you with a great solution for your 3D printing time lapse needs.

Here is a Brinno camera 3D printing time lapse informational video.

Brinno Time Lapse - Solar Joos Testing Update

2019 UPDATE: If you want an amazing new long term time lapse camera, please check out the Afidus ATL-200 at www.AfidusCam.com. We also have a web site dedicated to sales and support of time lapse cameras at www.TimeLapseCameras.com. Customer care is very important to us and we are here to ensure your time lapse project is a success.


Update: Solar Joos panels, are no longer available. If you are looking for long term time lapse information, please reach out to us at www.TimeLapseCameras.com.

I have had two Solar Joos Orange panels for about three months and have tested them extensively in many situations as a power source for the Brinno time lapse cameras.

In a previous post, Introducing a Solar Panel for your Brinno Time Lapse Camera, I gave my initial impressions, did a freezer test, overcast day test and an extended length darkness test. At the time, I was very impressed and now, after additional testing, I am very confident the Solar Joos panel will power your Brinno camera for months, even years without an issue.

Before I get into my testing, let me stray off track for a minute. The Solar Joos is a great product, weatherproof, sturdy and would survive the most extreme conditions. Here are some other scenarios I can think of where the Joos would be a perfect fit to keep your phone, GPS, GoPro, camera, portable game system and other devices charged.

  • Any back-country camping, hiking, skiing, snowmobiling or extreme adventure.

  • Emergency power in your vehicle in case of being stranded or a remote area accident.

  • Emergency power in your home to maintain communications due to a power outage or natural disaster.

  • Extended boating, river rafting, horseback ride trips.

  • A power source at a remote cabin, ice fishing shack, etc.

Brinno-Solar-Joos-Outdoor-Snow-Test

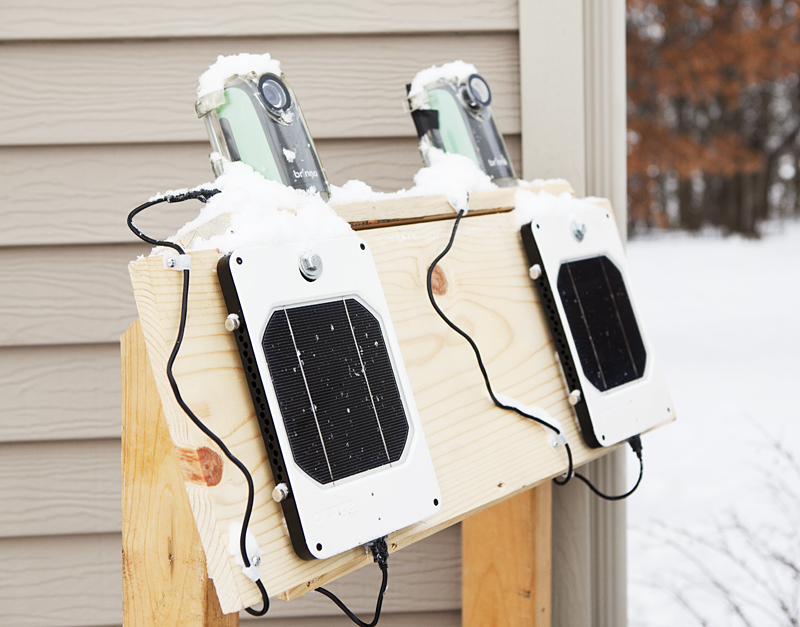
I started my latest tests in October and wanted to see how the Joos would perform in cold Minnesota weather. I built a test stand for both panels and at first kept the cameras indoors. I wanted to check the cameras often too see if power was lost. This test was done without batteries and even though my panels were at a bad angle (they collected snow) the panels powered the cameras for a couple weeks and were still at 100% charge when I reconfigured them at a different angle and wanted the cameras outside too.

Brinno_TLC-200_Solar_Panel_Winter_Test

Here is a photo from my latest test which has been ongoing for over two months. I made the mount angle steeper and removed the reflectors. The steeper angle was to keep snow from collecting on the panel. I removed the reflectors to see if they are necessary and in my opinion they are not, for powering Brinno cameras.

For this test I installed Energizer Ultimate Lithium batteries in the cameras. I have been told by Brinno techs, when the camera is connected to DC power, the batteries act as a back-up and only used if DC power is lost. I have used lithium batteries in the past with excellent results. I figure, there is little chance of the Solar Joos not providing power, but if it does the lithium batteries are a worry free backup.

For long term projects, in my case primarily construction, the Brinno battery life is amazing. I have often left cameras for three or four months unattended, which is well beyond Brinno's recommendations. I find myself falling behind when it comes to checking on cameras. Having a Solar Joos as a secondary power source would be a great peace of mind. As always, my primary concern with a long term project, is not the camera's battery life, rather an unplanned natural occurrence which interrupts the recording. A bird doing it's business on the lens, lightning, high winds, etc., all unlikely but possible.

The Solar Joos is the only product I recommend as a secondary source of power for your Brinno camera. It is my understanding there will soon be a bundled Joos and camera combination from BrinnoUSA.

For now, I only recommend the Joos for use with the Brinno TLC 200 f1.2 or the Brinno Construction Camera. The Joos will work with the Brinno TLC 200 Pro, however, if power is lost and then returns the camera shuts off. With the Construction Cam, if power is lost the batteries take over and when power is restored the camera keeps running. There is a firmware fix in the works, for the Pro to allow full functionality of the Joos.

Below is a short video showing the duration of sunlight hitting my test panels above which is direct sun for only about three hours.

The Brinno cameras are great products, the Solar Joos is a great product. Together they have an unprecedented ability to capture long term projects without user intervention. This concludes my testing of the Joos, my next post will detail mounting, connecting and weather proofing the cable connections.

Brinno Time Lapse - The Ultimate TLC 200 Pro Review

2019 UPDATE: If you want an amazing new long term time lapse camera with 1080, optical zoom, wi-fi app preview and more, please check out the Afidus ATL-200 at www.AfidusCam.com. We also have a web site dedicated to sales and support of time lapse cameras at www.TimeLapseCameras.com. Customer care is very important to us and we are here to ensure your time lapse project is a success.


After running across this review of the Brinno TLC 200 Pro time lapse camera, I have decided to stay out of the review business and leave the work to a true professional. In this case, Juan Bagnell of SomeGadgetGuy.com knocked his review out of the park.

Juan's review of the Pro is very accurate, informative and simply the best review I have yet to see. Other reviews may be good but they tend to miss details and sometimes give misleading information. This review is perfect and knowing the camera as well as I do, I 100% endorse this content. Great job with this production Juan!

My Christmas Gift Pick for 2014 and How to Get the Shot

A couple of posts ago, I mentioned I would be branching out to other topics. Although this one may seem like a stretch, after my review I will tell you how I got the light trail shot below. So this is a double bonus blog, a great gift suggestion and some photo tips.

Estes_ProtoX_Light_Trail_Photography

If you are looking for a fun and entertaining gift that will make the whole family smile. Look no further than the Estes Proto-X Nano Quadcopter. This is perfect indoor entertainment for anyone 10+.

Estes_Proto-X-Nano-Quadcopter_Flying

I have always wanted to get into drone photography, but flying one can be a challenge and I have never wanted to take the jump and invest in a $1,000 system to inevitably crash it on its first flight. My son had a gift certificate for our local hobby store, Everything Hobby, and we stopped in a couple of weeks ago and the perfect thing jumped out at him, this little drone. Perfect, I thought, Junior could become my future drone pilot.

Since this is a micro quad, I have a micro review. I am sure there are others reviews with every technical detail covered, but I am more thumbs up or thumbs down and this is unquestionably a thumbs up toy.

Estes_Proto-X_Micro_Drone_Quadcopter_Size

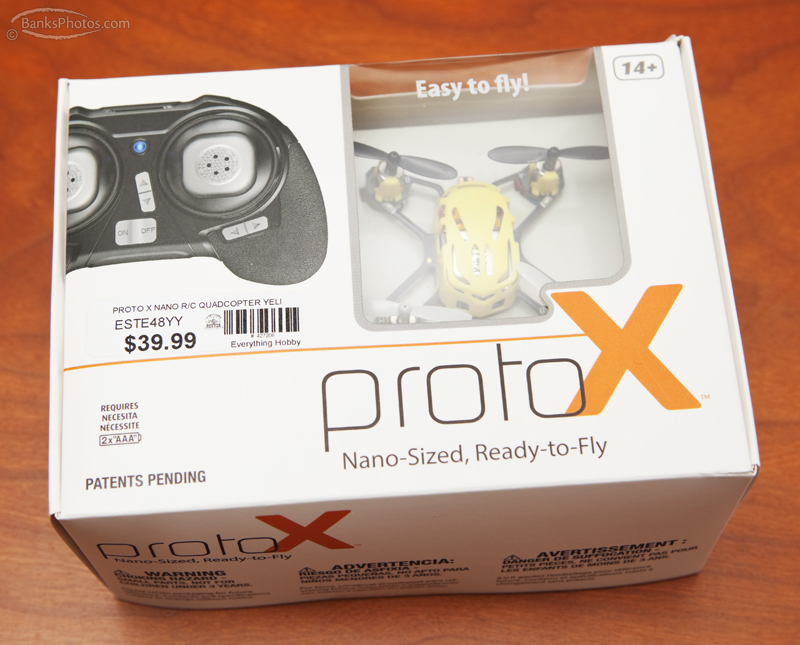
This quadcopter measures about 2.5” long and comes in a variety of colors. Everything you need is in the box, even a set of spare blades. The transmitter requires 2 AAA batteries. The drone itself is charged via an included USB cable. I found that charging was faster, about 15 minutes, when using a wall adapter versus a computer connection.

Estes_Proto-X_Nano_Quadcopter_Box

The instructions are a quick read, which I recommend before your first flight. This quad is small enough to fly in a living room and after a little practice with a bounce off a few walls and the ceiling you can control it with ease. The transmitter has controls for Up/Down, Forward/Back, Rotate and Left/Right. Rotate allows the quad to spin on its center axis which adds a nice touch of variety. If the quad drifts the transmitter has trim functions to adjust flight direction or maintain a hover.

This little thing is durable, ours has survived a few nasty crashes and its built to handle accidents. The rotors are designed to pop off with a bad collision. If more than one comes off, or you want to replace a chipped or damaged blade, there are letters A and B on each blade. These letters are very tiny and very hard to see, yet very important when replacing the blade. A and B are also marked on the frame, the corresponding rotor must be placed on the proper motor.

Estes_ProtoX_Quadcopter_Review_Transmitter

The LED lights at all four motors and the front add to the fun, the lights flash when the battery is getting weak, indicating it's time for a charge. Overall flight time per charge, is a little short, at about four minutes, but in about 15 minutes of charging and you will be flying again.

Overall, this is just a fun toy, almost like piloting a humming insect and will make a great gift.

There are two other models, I am excited to try. The Proto-X SLT has a few more features and the ability to flip for only $10.00 more. The Proto-X FPV is a big jump in price but includes a HD camera with a screen on the transmitter for a first-person view.

Where to Buy
Everything Hobby – Brick and Mortar store in Rochester and Austin, Minn.
Tower Hobbies – Online store with all three versions available

How I got the Shot

This photo, a crop of the one at the beginning of this post, is straight out of the camera and is the result of more luck than skill. This was a collaborative effort between my son, the pilot, and me, the camera and flash operator. This was shot in our dark living room, with all light sources turned off.

I used a Canon 5D Mark II and 24-70 lens on a tripod. I chose to use a cable release and mirror lock-up to eliminate any camera movement. My ISO was 160 for low noise, this is a five second exposure at f/9. The LEDs on the quad are quite bright, so f/9 allowed the lights to nicely streak while keeping the room dark and provide adequate depth-of-field.

To freeze and illuminate the quad, I used a studio strobe (Alien Bee Einstein) mounted on a light stand to the left and above the camera, firing down and to the right. The Einstein, on low power, is capable of freezing fast objects, so I had the power at about half so the rotors were not frozen.

Here is where the luck comes in. With the room lights on, the lens was prefocused about four feet out and switched to manual so it did not try to focus when the action began. I turned the lights off and my son fired up the quad. He tried to fly unique patterns in front of the lens. I triggered the cable release with my right hand and when I guessed the quad was in the right position I used the test button on the strobe to fire the flash. We went though a few quad charges and flights, I got a number of good photos, many bad ones but this one just worked.

You would not need a studio strobe to replicate this look. However, you will need an off camera flash of some type, a hand held Speedlite should work fine. You will need some patience and a little luck, but if you want to try this, I hope I have provided a little background info. Good luck and I would love to see your attempts.


Brinno Time Lapse in an Aiplane Cockpit

2019 UPDATE: If you want an amazing new long term time lapse camera, please check out the Afidus ATL-200 at www.AfidusCam.com. We also have a web site dedicated to sales and support of time lapse cameras at www.TimeLapseCameras.com. Customer care is very important to us and we are here to ensure your time lapse project is a success.


I had an opportunity to get a Brinno TLC 200 Pro time lapse camera into a commercial airplane cockpit. Sorting through footage, this was one of my favorite clips, a night approach and landing into Chicago O'hare International Airport. Select 720 using the gear icon on the player for the best quality.

This cilp represents about 20 minutes of flying. The camera was set to shoot ASAP which is about four frames per second. The final version was sped up slightly in iMovie. This was a simple clip to create, either it would work or it wouldn't. I think I lucked out and everything came together for this one.

UPDATES - This video is performing far better than anything I have posted. Below I am going to track the power of social media and provide milestone updates.

12/7/14 - Video posted to YouTube.
24 Hours
- Over 2,000 YouTube views and 200 Facebook shares.
12/12/14 - Over 100,000 YouTube views and 1,300 Facebook shares.

In Tags

Branching Out - Other Topics Coming Soon

Until now my blog has primarily devoted to sharing Brinno time lapse information. I do have more to share and I am just going to go for it. Photography, equipment, stock photography, techniques with a bit of randomness tossed in. I will continue to write about Brinno, I just want to branch out and break things up from time to time.

Josh_Banks_Rochester_MN_Photographer_Photo_Studio_Equipment

The photo above is a teaser, this is the majority of my studio equipment in one location. There are enough review sites to find all the information you ever wanted to know about cameras and lenses. I have a bunch of other less discussed but equally important goodies and the knowledge of how to use them in most any scenario.

In this shot there are eight studio strobes and three Speedlites simultaneously firing from a radio trigger and me standing in the center. There is enough light potential here to fill an auditorium.

All of this is the result of years of buying equipment, selling what didn't work and keeping the stuff that does and survives what I put it through on a daily basis. I take good care of my equipment but it is well used and I am not afraid of doing what it takes to get the shot whether in a barn, ditch, airplane or studio.

I am a big fan of the Alien Bees line of lighting products, Lastolite's Hi-Lite Background and Cube Lite portable studio, Elinchrom Ranger Quadra light kit, Kessler crane and slider, Pelican cases and more.

Much of what I have is budget friendly, my inexpensive Impact light stands and Impact umbrellas from B&H are great. I have probably gone through 40 of the umbrellas, not because they are cheaply made, rather disposably priced. For $10.00, it doesn't matter if they get painted, covered with mud, etc., it's stuff like this I want to share. I will also be Tweeting tips and updates so follow @BanksPhotos for the latest updates.

Brinno Update - A Year After My First Project

2019 UPDATE: If you want an amazing new long term time lapse camera with wi-fi app preview, please check out the Afidus ATL-200 at www.AfidusCam.com. We also have a web site dedicated to sales and support of time lapse cameras at www.TimeLapseCameras.com. Customer care is very important to us and we are here to ensure your time lapse project is a success.


This is the video that started it all and it has now been updated to include footage from this year and the completion of the project.

Back in December 2013, when the first version was published I had no idea it would be a life changing event, here is how it happened. Early in 2013, I was contacted by Rochester Public Utilities (RPU) to do this seemingly impossible project. The problem was finding the technology, the camera was to be mounted on another water tower so it needed to be weatherproof, require no external power and have a long battery life. Everything I found was either too expensive or a clumsy solution until I came across the Brinno line of time lapse cameras. I ordered a Brinno camera from Amazon, installed it in June, and crossed my fingers. Months past, with occasional camera checks and everything worked. In December, I uploaded the first version to YouTube and was contacted by Brinno's Social Media Manager a few days later. This video was one of the very first long term construction projects using the Brinno camera and it essentially got me discovered by the company.

Fast forward to now, and I am the nation's only Brinno Authorized Solutions Provider. I have a collection of Brinno cameras, lenses and accessories. I test solar panel solutions and new products. I create a variety of content, I now blog about Brinno cameras, help with their US web site and I was reluctantly coerced to become active on Twitter and Instagram. Brinno has invited me to represent them at the Consumer Electronics Show (CES) in Vegas. At times, my life revolves around Brinno which is not what I expected to be doing a year ago.

I have a few people to thank.

Tony Benson – RPU's Communications Coordinator who hired me to do this project and challenged me to find a camera solution.

Eric Berg – My video editing friend who gives my work a polished feel. The person with the thankless and at times endless job of removing night, weekend and uninteresting content.

Kat Von B – The Brinno Social Media Manager who saw the potential in this and contacted me. The person who has taught me the importance of social media, how to Tweet and that my Klout score is supposedly more important than my credit score.

Christopher R Adams – The President of Phase 3 Systems, the North America Brinno distributor, who entrusts his business reputation to me and listens to my sometimes crazy suggestions. Chris essentially let's me do my thing and has created a great work relationship, neither of us imagined a year ago.